Chapter 19 Anatomy and surgical approaches
Tom Symes and Kiran Singiseƫ
Introduction#
It is important to spend time learning surgical approaches and anatomy. At least two questions in the exam will be drawn from these areas in either the trauma and/or basic science vivas.
Anatomy is fairly straighfoorward for the FRCS(Tr & Orth), either it’s learnt and known well for the exam, allowing candidates to score easy marks, or it hasn’t been learnt and the viva quickly unfolds, losing scoring opportunities for the candidate. The skill is anticipating which questions are more likely to appear in the exam than others and adjusting your revision time accordingly to take this into account.
If candidates are not expecting to be questioned in any great detail on basic anatomy, then it will become quite difficult as anatomy for most purposes just needs to beknown.
The WHO Safer Surgery checklist has to beknown. This has become important for patient safety and the prevention of system failure.
Structured oral examination question 1#
Approach to hip for total hip arthroplasty
The candidate is shown a radiograph of THA (Figure 19.1a).
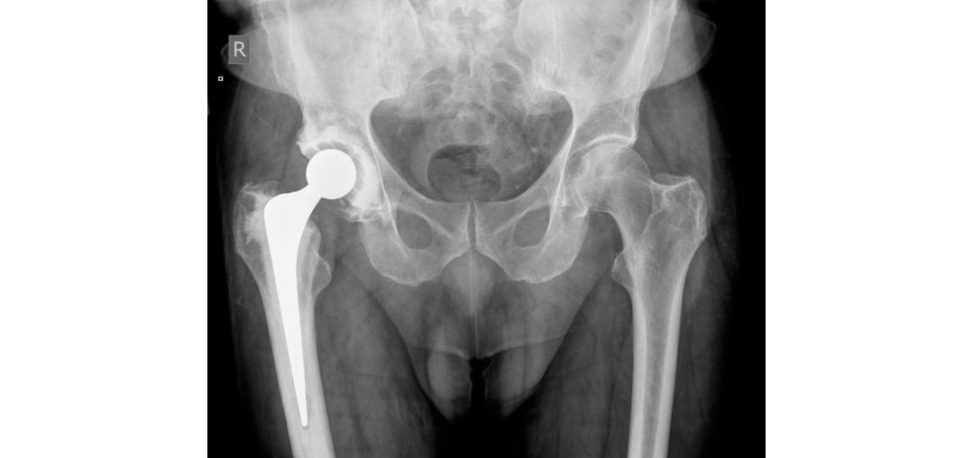
Figure 19.1a Anteroposterior (AP) pelvic radiograph demonstrating cemented right Exeter THA.
What approach do you use for THA?
The posterior approach to the hip joint. This is probably the most common approach you will be asked to describe. You could mention any of the hip approaches, but the most common approaches used int heUK are the posterior and the anterolateral (Hardinge). Talk about the approach that you know and use routinely . If you try to describe something that you have only read in a book, you will probably struggle to explain the details, including any technical tips or how to enlarge the approach. Read up on your favoured approach beforehand, especially the neurovascular intervals and structures at risk.
What approach would you use for a THA operation done for fracture neck of femur?
The posterior approach. I am aware that many surgeons use an anterolateral approach for this indication to reduce the risk of dislocation. The NICE guidance for hemiarthroplasty prefers an anterolateral over a posterior approach, but no such differentiation is suggested with THA. I would use a posterior approach in this situation, as this is the approach I am more familiar with using in THA. Candidates should be able to describe some rationale in using their preferred approach for the procedure.
Describe the approach from skin, fat, fascia, bursa, and muscular interval if relevant to the joint.
Posterior
Position Lateral decubitus. Supports placed anteriorly over ASIS, and posteriorly over the sacrum.
Landmarks: Greater trochanter.
Incision: The skin incision is 15–20 cm centred over the posterior aspect of the greater trochanter, curving posteriorly.
Superficial dissection: Incise f at and deep fascia inline with the skin incision. Insert Charnley retractors under the fascia/tensor muscle to allow visualization of the posterior aspect of the hip and trochanter.
Deep dissectionS weep fat of the short external rotators (ER) at the posterior aspect of the hip joint. Identify and tag the piriformis tendon, which can be difficult to identify if flimsy. Divide the piriformis, gemelli obturator tendons and quadratus femoris muscle off the trochanter from just below the trochanteric ridge. Release of the gluteus maximus insertion distally into the linea asper amay be necessary when greater mobilization of the femur is required, such as complex primary, resurfacing and revision. Consider partial release in unfavourable primary THA situations such as large BMI, inexperienced scrub assistant or during the surgery learning curve.
Divide the capsule, dislocate the femoral head posteriorly. Excise the femoral head using a saw.
Place a large retractor at the anterior edge of acetabulum at 2–3 o’clock rim, releasing incision inferior capsule, place Charnley spike or Judd pin posterior to the acetabular wall and an additional retractor inferiorly (Hohmann) just below the transverse acetabular ligament to overall give a 360° view/exposure of the acetabulum.
Some surgeons do not routinely detach the piriformis.
I generally do so unless I am particularly worried about instability – but I would go anterolaterally if this was the case. Candidates may be asked origins/insertions and nerve supply of the short external rotator muscles hip.
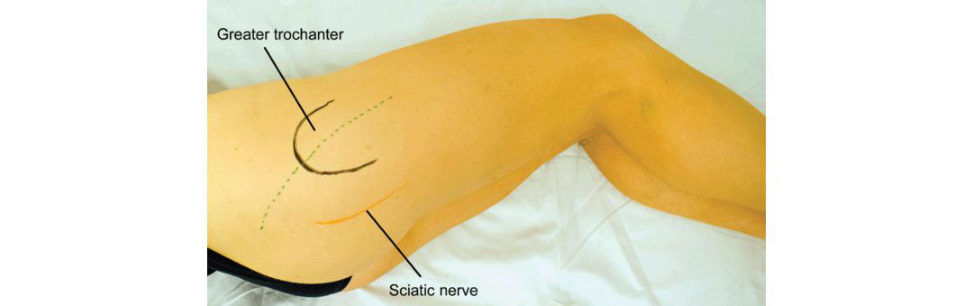
Figure 19.1b Skin incision for posterior approach hip. Landmarks: greater trochanter. Incision: a curvilinear incision starting 10 cm distal to the PSIS extended distal and laterally parallel to the fibres of the gluteus maximus to the posterior margin of the greater trochanter and then direct the incision 10 cm distally parallel to the femoral shaft. Thes cia tic nerve enters the lower limb in the gluteal region and passes inferiorly midway between two major palpable bony landmarks: the greater trochanter and the ischial tuberosity.
Lateral (Hardinge)
Position Lateral decubitus position with supports.
Landmarks: ASIS, GT and femoral shaft.
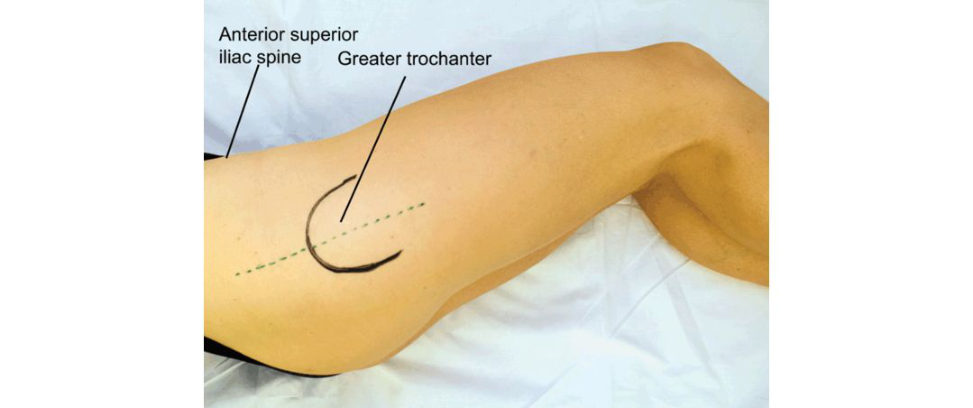
Incision: Longitudinal midlateral incision centred over the GT tip and distally inline with the femoral shaft.
Internervous plane: No true plane.
Superficial dissection: Incise f at and fascia inline with the skin. The greater trochanter should come into view. The tensor fascia lata is retracted anteriorly and the gluteus maximus posteriorly (Figure 19.1c).
Deep dissection: The gluteus medius is incised, extending from the uppermost end of the ridge of vastus lateralis, curving around the greater trochanter in an omega-shaped incision, until it reaches the apex of the greater trochanter, where it is extended proximally between the fibres of the gluteus medius. Distally the incision is extended into the vastus lateralis inline with its fibres, elevating the anterior third incontinuity with the medius tendon.
Avoid taking the dissection too far proximally (injury to the superior gluteal nerve). Perform an H-or inverted T-shaped capsulotomy and then dislocate the femoral head.
Figure 19.1c Skin incision for a lateral approach to the hip (Hardinge). Landmarks: greater trochanter and anterior superior iliac spine. Incision: longitudinal incision centred over the tip of the greater trochanter in the line of the femoral shaft.
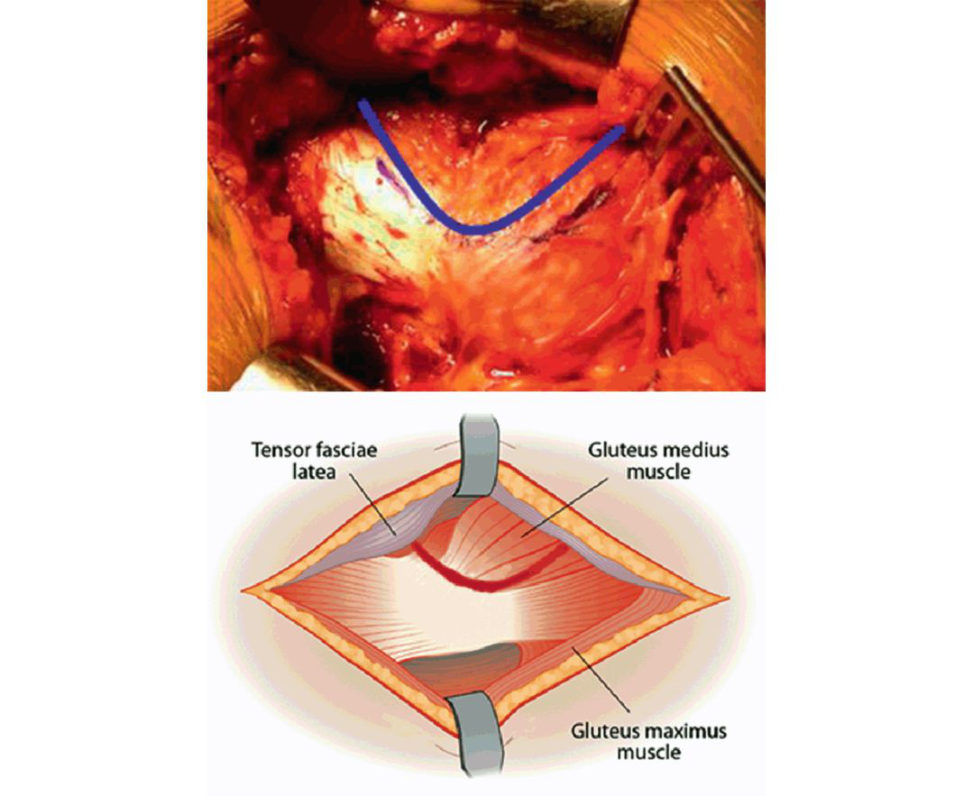
Figure 19.1d Omega incision into the gluteus medius tendon. Modified Hardinge approach maintaining two-thirds of the medius and releasing towards the lesser trochanter and not vertically downwards, maintains the medius–lateralis tension bandas well as exposes the acetabulum and the femoral shaft necessary for standard THA.
Anterolateral (Watson-Jones approach)
This approach avoids the need to cut the gluteus medius muscle, but involves considerable pulling
(traction) on the gluteus medius and TFL muscles and potentially on the superior gluteal nerve. If used for
THA it often requires additional division of the gluteus medius and minimus which lie over the anterior capsule for adequate exposure, which may lead to a Trendelenburg gait. This approach is not often used int heUK for primary THA, although a minimally invasive anterolateral approach hip (modified Watson-Jones) using special retractors, patient positioning devices, and offset reamers has gained some popularity recently.
Position: Supine position with a sandbag under the buft ock and the buft ock hanging slightly over the edge of the table.
Landmarks: ASIS and greater trochanter.
Incision: Incision is started 2 cm posterior and distal to theA SIS. It curves distally and posteriorly to the apex of the greater trochanter to extend longitudinally down about 6 cm distally along the shaft of the femur.
Internervous plane: No true internervous plane as tensor fascia lata and gluteus medius share the same nerve supply (superior gluteal nerve).
Superficial dissection Subcutaneous tissue and fascia lata are incised in the same lineas the skin.
The interval between the gluteus medius and the tensor fascia lata is often difficult to delineate.
However, it can be found more easily by beginning the separation midway between the anterior superior iliac spine and the greater trochanter before the tensor fascia lata blends with its fascial insertion. The incision is continued proximally along the posterior border of tensor fascia lata and the inferior branch of the superior gluteal nerve innervating the TFL is often seen.
Deep dissection: The tensor fascia with tensor fascia lata is retracted anteriorly and the gluteus medius posteriorly, exposing the fatiy tissue covering the anterosuperior aspect of the hip capsule. The vastus lateralis is sometimes needed to be reflected from the proximal femur distal to the greater trochanter.
Structures at risk: Superior gluteal nerve.
Extension of approach: The fibres of the vastus lateralis may besplit longitudinally to expose the upperpart of the femoral shaft.
What nerve is at risk in each approach and when?
Posterior: sciatic nerve during approach. Femoral nerve during retraction/ exposure of the anterior acetabulum. Obturator nerve: during inferior acetabulum retraction. Lateral: Superior gluteal nerve (3–5 cm above the upper border of the greater trochanter) during the approach through the abductors, femoral nerve, artery and vein (retractors); transverse branch of lateral circumflex femoral artery (as vastus lateralis is mobilized).
What is the consequence of damage in terms of sensory loss, weakness?
Sciatic – most commonly affects peroneal branch; therefore, foot drop and sensory loss dorsum of the foot. Femoral – weak knee extension and loss of sensation over the medial border of the leg and foot. Superior gluteal nerve – abductor weakness, Trendelenburg gait. You must know your peripheral nerve lesions and sensory dermatomes for many different topics, e.g. spinal injuries, ATLS assessment, brachial plexus.
Which approach is more extensile for revision hip surgery?
The posterior. It is acceptable to mention another approach if you can justify it.
What manoeuvres can be performed to improve exposure of the acetabulum?
Release piriformis, anterior capsule, reflected head of rectus femoris, psoas tendon.
What manoeuvres can be performed to facilitate removal of cement and/or a femoral stem which are difficult to remove?
Extended trochanteric osteotomy. Trochanteric osteotomy/slide. Window in femur.
Describe how you would perform an ETO.
Ideally preoperative planning in which the osteotomy length is determined from the tip of the greater trochanter. I would expose the lateral femur by elevating the vastus lateralis off the linea aspera with due care to identify the perforating vessels. Then mark out the osteotomy line using cautery planning for a posterior to anterior longitudinal cut and a short distal transverse cut. Then two or three osteotomes are used to elevate the osteotomy fragment with a muscular hinge anteriorly. I use a prophylactic cerclage cable distal to the osteotomy site.
What are your indications for ETO?
1. Improved exposure during approach. 2. Removal of femoral cement (especially infection). 3. Removal of well-fixed uncemented femoral prosthesis.
4. Removal of cement plug, poor bone stock, high risk of perforation varus malformation).
5. Abnormalities of the proximal femur.
Structured oral examination question 2#
Approach to the hip for drainage
A radiograph of a child’s hip is shown (Figure 19.2).
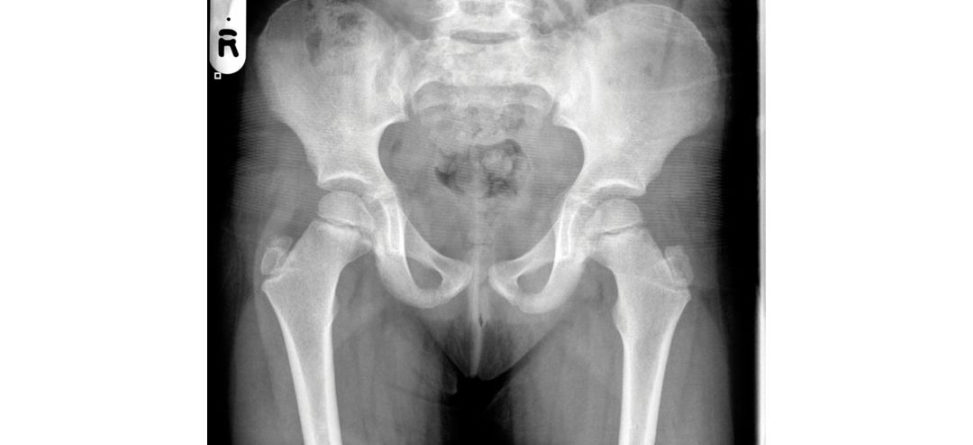
A 5-year-old boy presents to A&E with a 2-day history of fevers, off legs, c/o painful hip and knee. This is his X-ray. After taking a history and examination, what tests would you perform (likelihood of hip sepsis)?
FBC, CRPES RUSS, MRI. Hip sepsis in children is a common question a t several points in the exam and needs to beknown well. There are studies that have produced prediction of the likelihood of septic arthritis depending on blood markers and clinical features. If the viva station is progressing well it should be relatively easy to throw inKo cher’s criteria for a child with a painful hip: Raised CR PRaised white cell count. Inability to bear weight. Pyrexia. Four of the criteria are 99% sensitive for septic arthritis; three are 93% sensitive two are 40% sensitive and one is 3% sensitive.
Figure 19.2 Radiograph of child’s hip.
Reference
Kocher MS, Zurakowski D, Kasser JR. Differentiating between septic arthritis and transient synovitis of the hip in children: an evidence-based clinical prediction algorithm. J Bone Joint Surg Am. 1999;81(12):1662–1670.
The candidate is presented with test results (increased WBC, CRP, ESR, effusion on X-rays and USS). What is the management?
Open washout and drainage. Some surgeons may argue that you should perform a USS-guided drainage to identify pus or a positive culture but the examiners in this situation want you to describe the approach, so will make it a barndoor case.
Which approach is recommended to perform open drainage and washout of a child’s septic hip and why?
Anterior (Smith Peterson) because the main blood supply to the femoral head is posterior. You must know this approach for the basic science and also the paeds viva.
Describe the layers and nerve supply.
Supine position. Incision (use part of this) following anterior half of iliac crest toA SIS then curved down vertically 4–5 cm towards lateral side of patella. Externally rotate the leg, identify the gap between the sartorius (femoral nerve) and the tensor fascia lata (superior gluteal nerve) about 5 cm below theA SIS, avoid the lateral femoral cutaneous nerve which pierces the deep fascia near the interval, incise the fascia medial to the TFL and retract it downwards and laterally, retract the sartorius upward and medially. Ligate the ascending branch of the lateral femoral circumflex artery (which crosses the gap between the sartorius and tensor fascia lata), then develop the plane between the rectus femoris (femoral nerve) and the gluteus medius (superior gluteal nerve). Detach the two origins of the rectus femoris (AIIS and superior lip of acetabulum), retract the rectus femoris and the iliopsoas medially and the gluteus medius laterally to expose the hip capsule, capsulotomy (longitudinal or T-shaped) and then washout the hip joint. This is a pass–fail question and must beknown.
Structured oral examination question 3#
Henry’s/anterior approach to arm
Describe this radiograph (Figure 19.3).
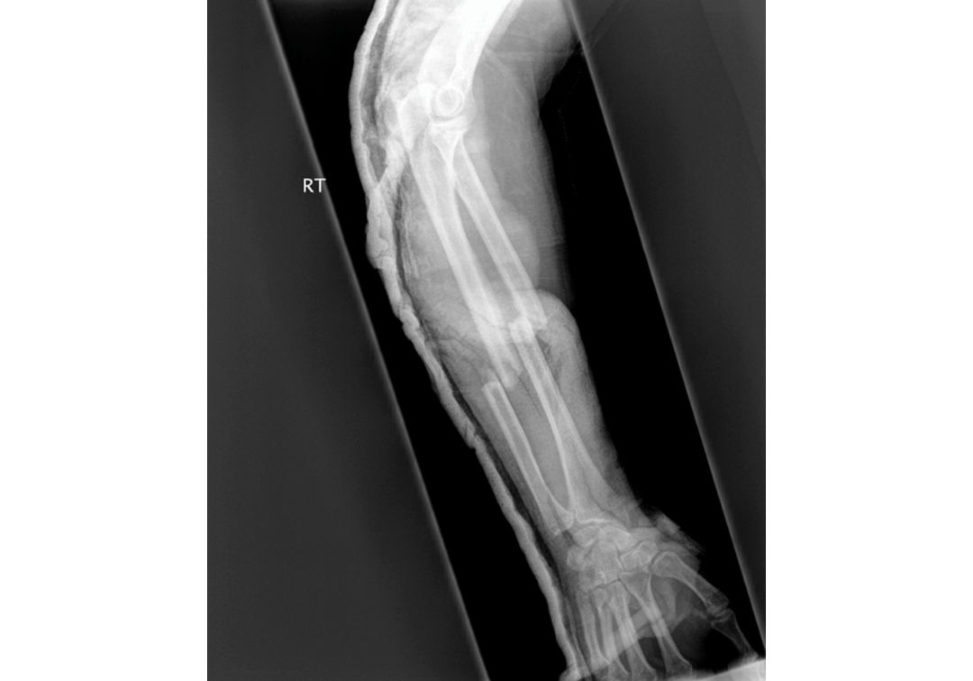
It is an X-ray of the right forearm of an adult. There are transverse fractures of the mid shaft of both radius and ulna. They are completely displaced. You must be able to quickly and concisely describe a fracture as if you were talking to your consultant on the end of a phone and so he can easily imagine the fracture pattern.
How would you describe the displacement concisely?
They are off-ended.
What is the generally accepted surgical treatment for this injury?
Plating of both bones with dynamic compression plates.
If you were to approach the fractured radius anteriorly, how would you do it?
The anterior approach to the radius was first described by Henry and his name is usually associated with it. Henry’s approach can be divided into a proximal internervous plane between the brachioradialis muscle (radial nerve) and the pronator teres (median nerve) or a distal approach between brachioradialis (radial nerve) and the flexor carpi radialis muscle (FCR) (median nerve). The internervous planes are the same throughout the forearm, but the muscles encountered are different proximally and distally. The deep surgical dissection is divided in to thirds (proximal, middle and distal third). Landmarks: Biceps tendon, brachioradialis (part of the mobile wad), lateral epicondyle of humerus and styloid process of radius. Incision: Incise the skin over the FCR aiming towards the biceps insertion Develop the plane between the brachioradialis (radial nerve) and the FCR (median nerve) distally and retract the FPL. I would approach the distal radius through the bed of the FCR. The sheath of FCR is incised and the tendon freed and retracted in an ulnar direction to protect the median nerve. Next, the floor of the FCR sheath is incised. Directly beneath the sheath is the belly of the flexor pollicis longus (FPL). The muscle is bluntly swept to the side to expose the deep fibres of the pronator quadratus. The radial portion of the pronator quadratus is incised and dissected off the distal radius using a combination of sharp dissection and aper ios teal elevator with an L-type incision. A small cuff of tissue isle ft for later repair. Often there is partial disruption by the fracture fragments in high-energy injuries. The candidate for whatever reason has described the anterior volar approach to the distal radius. The radiograph demonstrates a mid-third radius fracture and as such the examiner should have guided the candidate back onto the mid-third radius approach. The superficial muscular dissection is similar for all three parts of Henry’s anterior approach: the interval between the brachioradialis (mobile wad) and the flexor carpi radialis (FCR) muscle. The radial artery lies deep to the brachioradialis in the middle part of the forearm and between the tendons of the brachioradialis and the FCR distally. It is identified by its two venae comitantes that run alongside it.
The middle third of the radial shaft is covered by the pronator teres (PT) and the flexor digitorum superficialis (FDS) muscle. The arm is pronated to expose the insertion of the P T onto the lateral radial shaft. The insertion is detached , and the muscle stripped off in an ulnar direction, which also detaches the origin of the FDS.
How would you position the patient?
I would position the patient supine with an arm board and upper arm tourniquet. I would elevate the arm but not exsanguinate it so as to keep the veins engorged. This helps with identification of the venae comitantes of the radial artery. I would perform a surgical time-out before inflating the tourniquet, undertaking skin preparation and draping. Go through a set standard routine for each approach. This question is about how you set the patient up for surgery. Ideally, the candidate should have initially mentioned this.
What do you mean by a surgical time-out?
This is the final step before the start of the surgical procedure where the patient surgical procedure and side/site are reviewed by the surgical team. This is a classic approach and anecdotally candidates have been failed for not knowing it! Some approaches have quirks or peculiarities, and this is one of them – the need to change the position of the limb depending on the fracture location. Try to have a mental picture of the origins and insertions on the radius from proximal to distal when describing this approach.
How would you extend the exposure proximally?
This approach can be extended across the elbow into an anterolateral approach to the humerus, but this is rarely required.
How would you extend the exposure distally?
The approach can be extended distally into the wrist with a carpal tunnel-type incision.
What are the structures at risk (SAR)?
PIN: this travels through the body of supinator and can be damaged when exposing the proximal third of the radial shaft. Fully supinate the forearm when dissecting the supinator muscle off the radius as this moves the PIN away from the operative field. A subperiosteal dissection stripping the muscle from bone rather than spliting the muscle thereby leaving the PIN in the substance of the muscle. Ensure full supination and a void using a retractor on the posterior radial neck to avoid potential injury.
Superficial radial nerve (SRN): this runs down the forearm underneath the brachioradialis muscle.
It is vulnerable when the mobile wad of three is mobilized and retracted laterally. The nerve can be damaged with vigorous retraction. The SR Nis notorious in developing a painful neuroma second to innocuous injury.
Radial artery: runs down the middle of the forearm under brachioradialis. A leash of vessels from the radial artery supply the brachioradialis and they need to be ligated in order to mobilize the brachioradialis. The radial artery is vulnerable during mobilization of the brachioradialis and is often retracted medially to expose the deeper muscular layers.
Figure 19.3a Forearm fracture.
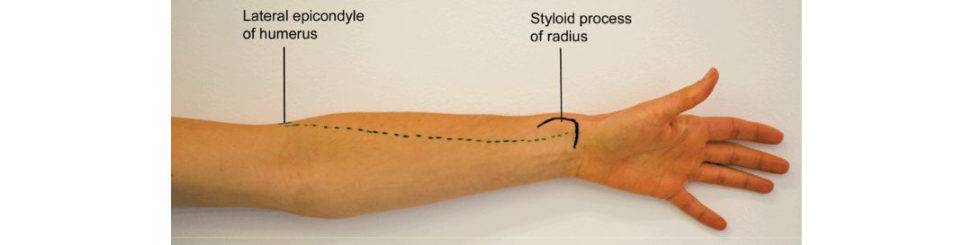
Figure 19.3b Anterior approach to the radius. Landmarks: biceps tendon, brachioradialis, lateral epicondyle humerus and styloid process of radius. Incision: a longitudinal incision from the elbow flexor crease lateral to the biceps tendon down to the radial styloid.
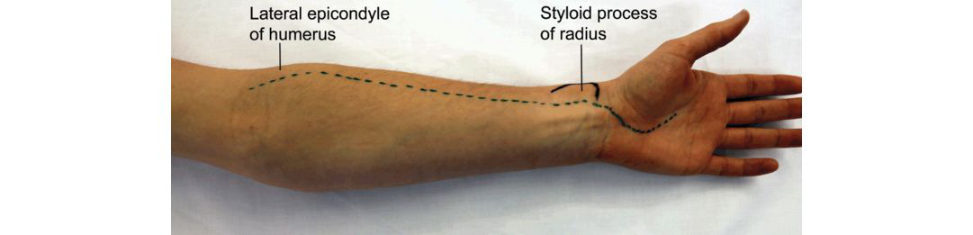
Figure 19.3c Anterior approach to the radius. How to enlarge the approach proximally and distally.
For score 7/8
What are the relative advantages and disadvantages of a volar compared to a dorsal approach to the radius?
While a volar approach is the standard and preferred method for a fracture of the distal half of the radius, the approach for its proximal half is controversial. Henry’s anterior approach to the radius is an extensile approach and offers full exposure of the radial shaft if required. As mentioned, the structures at risk in this approach include the PIN, radial artery, superficial radial nerve, lateral cutaneous nerve of forearm and recurrent leash of Henry. In the dorsal approach, access to the bone is easier and the posterior or tension surface of the bone is in full view. The plate is applied to the tension dorsal side of the radius, which is biomechanically more favourable. The PIN is more vulnerable to injury in this approach, but injury to the nerve can occur whatever approach is used, and great care is needed during surgical dissection of the supinator muscle. Plating on the anterior surface may cause impingement on the bicipital tuberosity and the biceps tendon. The AO website has excellent intraoperative drawings and tips on surgical technique.
What plate size would you use?
3.5 DCP. This may lead on to a discussion of what is a plate, what is a screw, what are the features of a screw. You should be able to describe all these pieces of orthopaedic hardware.
Structured oral examination question 4#
Posterior approach to the knee
Apa tien t is admift ed with the above isolated injury [candidate is shown a radiograph of a knee dislocation]. Describe your initial steps in management.
This is a high injury and as such I would want to manage according to ATLS principles. It is important to perform a neurovascular assessment. The examiners have mentioned this is anis ola ted injury, so they do not want a great deal of detail about ATLS assessment, they want to get to the orthopaedic stuff.
The patient has a cold foot, no peripheral pulse and altered sensation. What is the management?
I would reduce the knee in theatre if possible under II control with the option of applying a spanning external fixation if needed to maintain reduction and provide stability. If there are major delays geting in to theatre I would consider reducing the knee in casualty under sedation.
Now what?
I would reassess the neurovascular status.
The patient foot is still c old with possibly a faint pulse. Any other tests you want to do?
ABPI – you need to know what ratio is g ood/bad (> 0.9 rules out significant arterial injury).
Arteriogram – would you delay surgery if imaging will take longer than 2 hours?
I would obtain an urgent vascular review. There is some debate about whether all patients should have an arteriogram, but several papers have demonstrated good outcomes using clinical assessment and selective arteriography. Obtaining an arteriogram should not delay the emergency treatment of an obvious vascular injury. Try to have evidence to back up your answer, if you can quote a paper such as the one below you will be on your way to a 7.
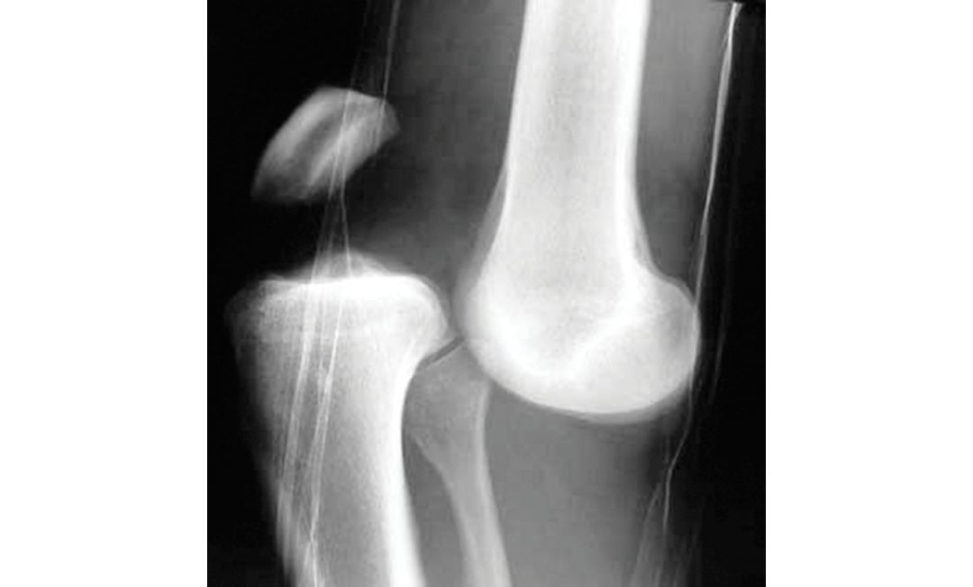
Figure 19.4a Lateral radiograph of anterior knee dislocation.
Reference
Stannard JP, Sheils TM, Lopez-Ben RR, McG winG Jr, Robinson JT Volgas DA. Vascular injuries in knee dislocations: the r ole of physical examination in determining the need for arteriography. J Bone Joint Surg Am 2004;86A(5):910–915.
The vascular surgeon is 1 hour away. He wants you to start the posterior approach to the popliteal fossa.
Inreality, it would be very rare to have to perform this approach, but it is known to be one of the most commonly asked approaches in the vivas.
How do you position the patient?
Prone position.
Anything you might do before positioning to make your life easier?
Apply a tourniquet.
What landmarks do you use for the skin incision?
The two heads of the gastrocnemius muscle from the posterior femoral surface just above the medial and lateral condyles. Semimembranous and semitendinous on the medial border of the popliteal fossa. Curvilinear incision centred over the popliteal fossa starting laterally over the biceps femoris and distally over the medial head of the gastrocnemius. To prevent skin necrosis I would avoid an acute incision angle when transitioning from the vertical to the transverse portion of the incision.
What about the internervous plane?
There is no true internervous plane. The approach exploits the fossa between the medial and lateral heads of the gastrocnemius. The candidate should have volunteered this without the need for it to be teased out of them.
What structures are you looking for to guide you in this approach?
I would identify the short saphenous vein; on the lateral side of the vein is the medial sural cutaneous nerve; I would trace the nerve to its origin from the tibial nerve in the apex of the popliteal fossa. At the apex the common peroneal nerve separates from the tibial nerve; I would identify and protect this. The popliteal artery and vein lie deep and medial to the tibial nerve.
Where is the artery in relation to the vein?
The popliteal vein lies medial to the artery as it enters the popliteal fossa from below. Then it curves, lying directly posterior to the artery while in the fossa. Above the knee joint, it moves to the posterolateral side of the artery. The tibial nerve enters the popliteal fossa from its superior edge, lateral to the popliteal artery. In the middle of the popliteal fossa, the tibial nerve crosses posterior to the artery to its medial aspect and remains at that location. The deep dissection involves retracting the muscles that form the boundaries of the popliteal fossa to expose the posterior knee joint capsule. The medial and lateral heads of the gastrocnemius can be released to increase exposure, but this should be avoided if possible.
What are the structures at risk?
Structures at risk include the medial sural cutaneous nerve, tibial nerve, common peroneal nerve and popliteal vessels (the vein is posterolateral to artery at the apex, crosses posteriorly behind the knee and then lies medial). I would use blunt dissection when handling the neurovascular bundle. Care must betaken to avoid injuring the tibial nerve, which is the most superficial portion of the neurovascular bundle. Because of anatomic variation it is important to take care to avoid injuring any unusual branching patterns of the nerve or blood vessels.
How can you extend this approach?
There is no useful extension.
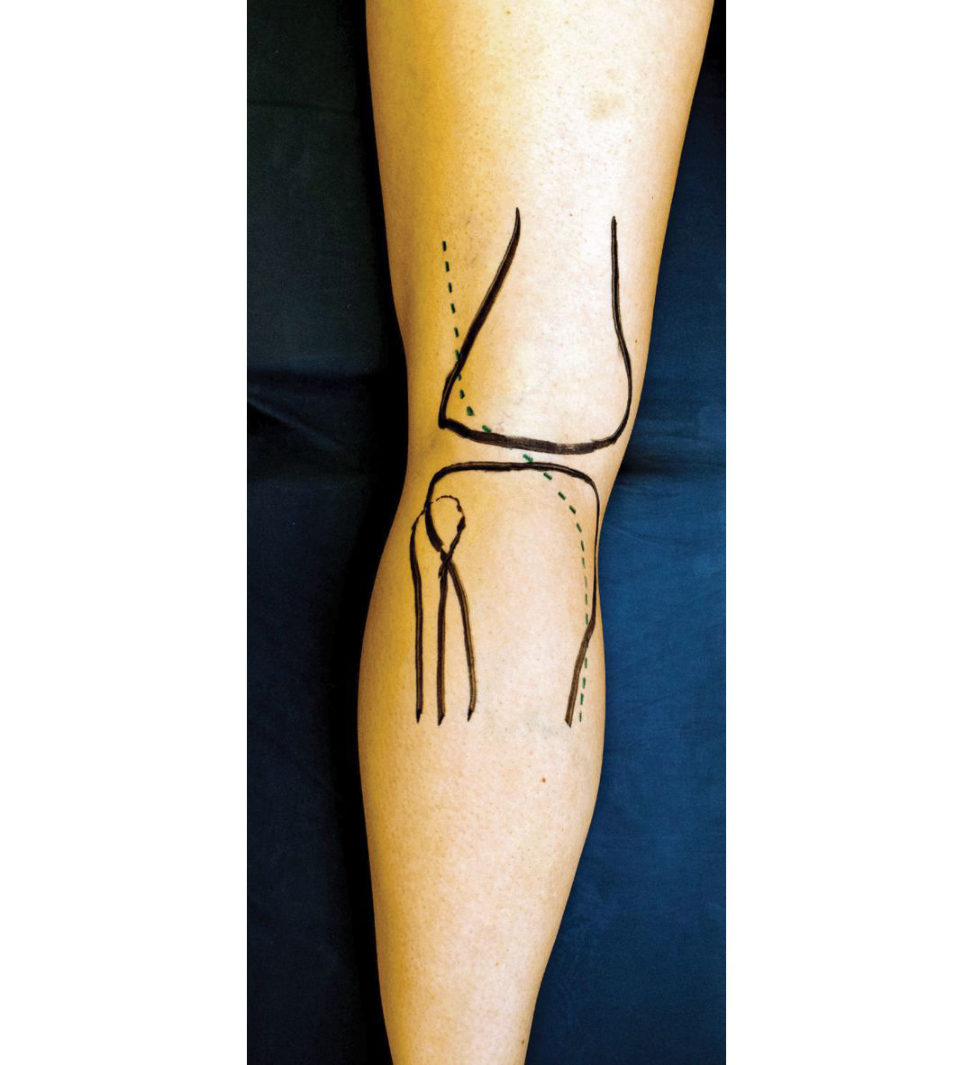
Figure 19.4b Posterior approach to the knee. Curved incision, starting laterally over the biceps femoris, obliquely across the popliteal fossa, downwards over the medial gastrocnemius.
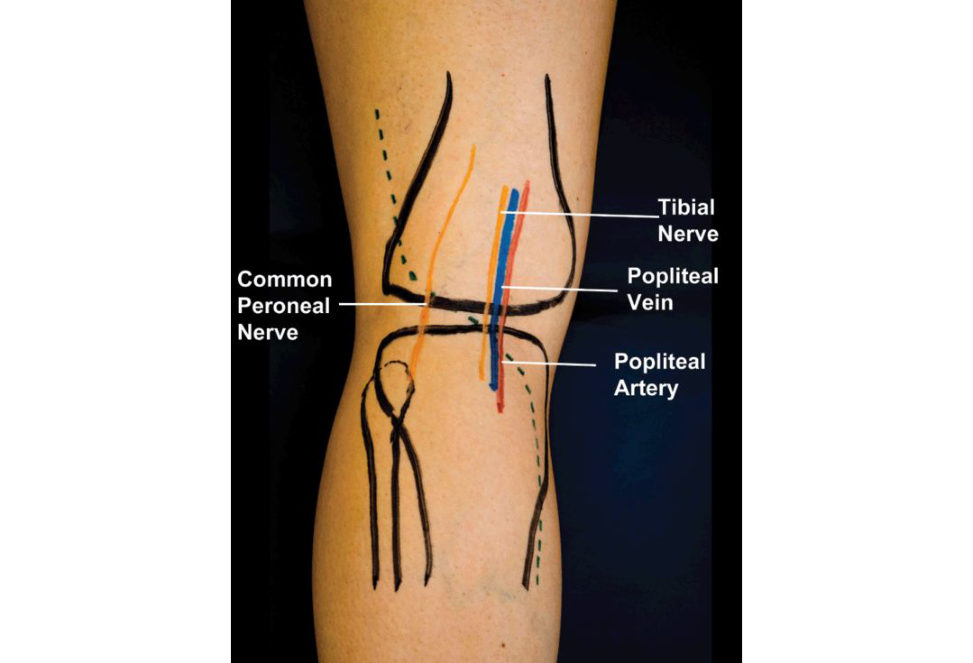
Figure 19.4c Posterior approach to knee. The popliteal vein lies between the tibial nerve and the popliteal artery.
Structured oral examination question 5#
Posterolateral approach to the ankle
Describe this fracture (Figure 19.5).
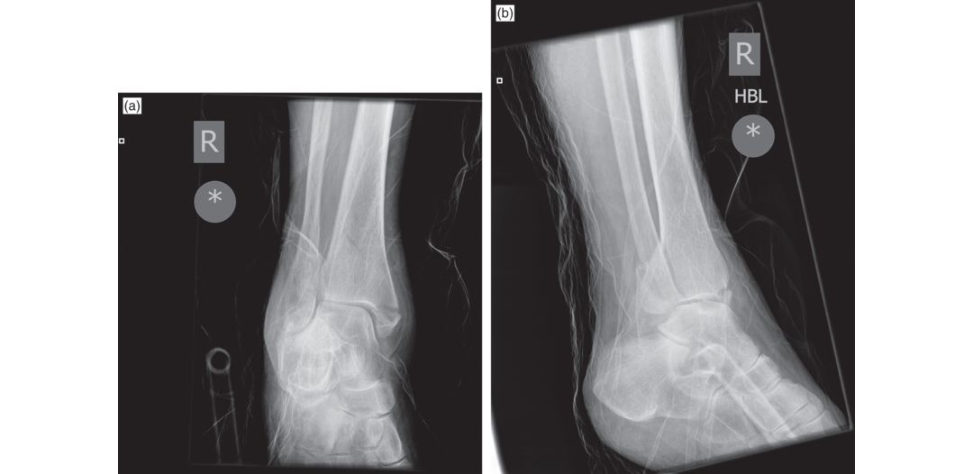
These are AP and lateral views of a right ankle demonstrating a trimalleolar ankle fracture. There is talar shift dislocation of the ankle and significant displacement of the posterior malleolus.
What classification systems do you know to describe ankle fractures?
The Weber system.
Please expand on this.
The Weber classification describes the fracture in relation to the syndesmosis between the tibia and fibula. Weber A fractures occur below the syndesmosis. Weber B fractures occur at the level of the syndesmosis. Weber C fractures occur above the syndesmosis.
Do you know of another classification system based on mechanism of injury?
That would betheL auge Hansen system.
How would you classify this fracture and what is the sequence of injury to the ankle?
This is a supination external rotation injury. The first injury is to the anterior tibiofibular ligament, then a fracture of the fibular, followed by rupture of the posterior tibiofibular ligaments and then injury to the medial side, either a fracture of the medial malleolus or rupture of the deltoid ligament.
What direction is the fracture of the fibula?
I don’t know. It is important to recognize that the direction of the fibular fracture in a SER injury is distal anterior to proximal posterior. In the pronation external rotation injury the fracture line runs proximal anterior to distal posterior.
How would you fix this fracture?
Answer options. 1. Reduce and fix the fibula. If the post malleolus reduces, fix PM with AP screws. 2. Reduce the PM through fracture site. Fix with AP screws. 3. Reduce and fix the PM through the posterolateral approach.
The posterior malleolus does not reduce when the fibula is reduced; therefore, you decide to perform a posterolateral approach to the ankle to reduce and fix the fragment under direct vision.
You could say that you are not familiar with this approach and you would prefer to use one of the other approaches above, which is acceptable as longas you know it well and how to reduce and fix the fracture using this approach.
Describe the steps and neurovascular interval.
The position can be prone or lateralI prefer the prone approach because I am more familiar with it. Tourniquet. Landmarks: Fibula and lateral border of Achilles tendon. Skin incision half-way between the fibular and the Achilles tendon, from the tip of the fibular to 10 cm proximal. Mobilize identical skin flaps. Identify preserve and protect the sural nerve and short saphenous veins that run just behind the lateral malleolus. Incise the deep fascia and identify the peroneal tendons, retract these laterally and anteriorly. Incise the fibres of the flexor hallucis longus over its lateral border and retract it medially, incise the periosteum longitudinally to reach the fracture site.
What internervous plane are you utilizing?
This is between the peroneal tendons laterally (superficial peroneal nerve) and the flexor hallucis longus medially (tibial nerve).
Can you extend this approach proximally?
Yes, by extending the skin incision and then developing the interval between the peroneal muscle laterally and the gastrosoleus complex medially.
What are the structures at risk?
The sural nerve. The nerve crosses the incision at its midpoint so is at particular risk in this area. If injured a painful neuroma can develop. Short saphenous vein.
Figure 19.5a and 19.5b Anteroposterior (AP) radiograph of a trimalleolar fractured ankle with a large displaced posterior malleolar fragment.
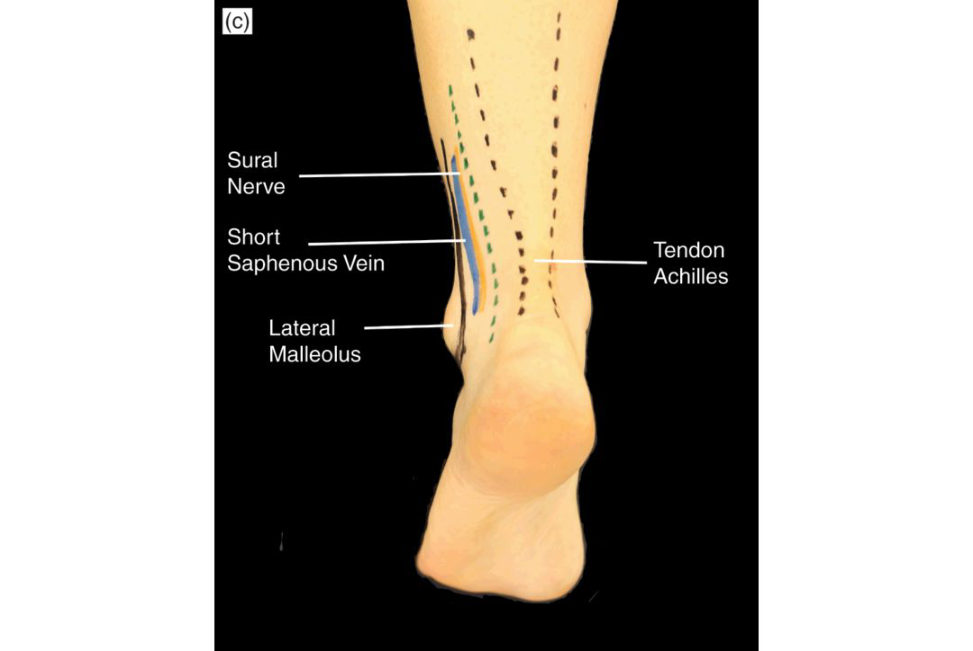
Figure 19.5c The posterolateral incision is performed on the medial side of the posterior edge of the fibula. The short saphenous vein and sural nerve run close together and should be preserved as a unit.
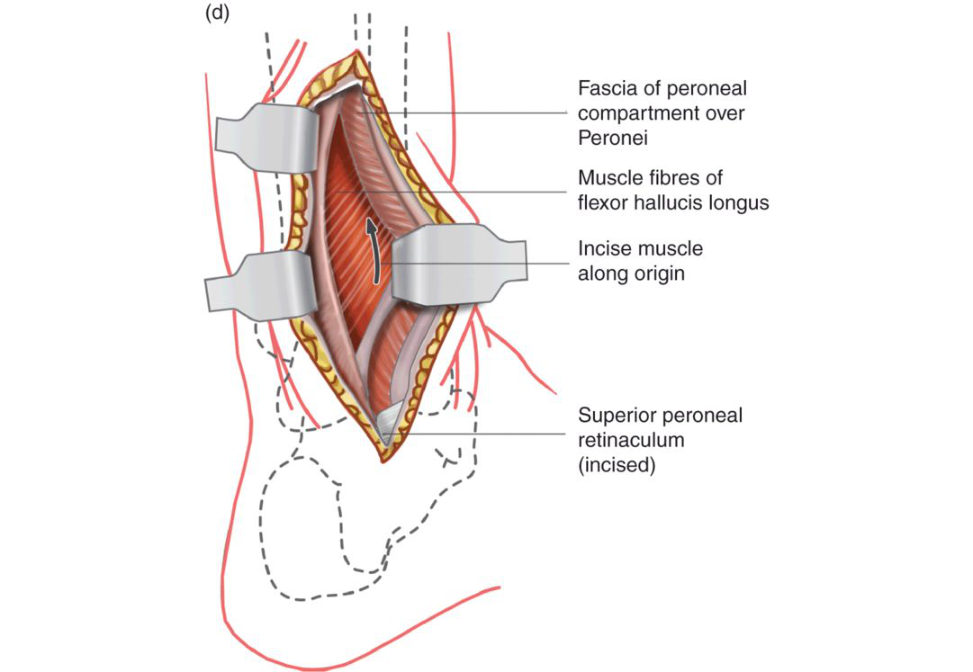
Figure 19.5d Deep dissection. A longitudinal incision is made through the lateral fibres of the flexor hallucis longus as they arise from the fibula.
Score 7
What are the advantages of fixing the posterior malleolar fracture by this method compared to anteroposterior screws?
Although AP screw fixation isless invasive than the direct posterolateral approach, it does not allow direct visualization of the fracture fragments and does not allow removal of any interposed periosteum or removal of organized blood clots. It is a real internervous plane and allows muscle tissue between the hardware and skin. Gravity will help with intraoperative reduction, rather than being a deforming force, when the patient is placed in the supine position. Another advantage is that the hardware with the posterolateral approach is deep in the ankle, with good soft -tissue coverage and no irritation to the patients Reported minimal major wound complications and need for reoperation. A major advantage is that abut iress plate can be applied rather than using one or two screws, which provides better biomechanical fixation.
What about the fibula fracture?
The peroneal tendons are retracted medially, which gives excellent access to the posterior distal fibula.
Score 8
How do you fix the fibula?
Direct visualization for posterior antiglide plating of the fibula is one of the most valuable aspects of the approach. Although posterior plating of the fibula may be performed through the lateral approach, retraction of the peroneals, supine patient positioning and direct anterior to posterior screw placement is more difficult. The approach enhances the ability to position the anti glide plate without those factors impeding optimal plate placement as well as facilitating posterior malleolus fracture fixation.
What are the disadvantages?
Fixation of the medial malleolus can be difficult using the posterolateral approach. Unfamiliarity of the approach.
Structured oral examination question 6#
Anterior approach to the cervical spine
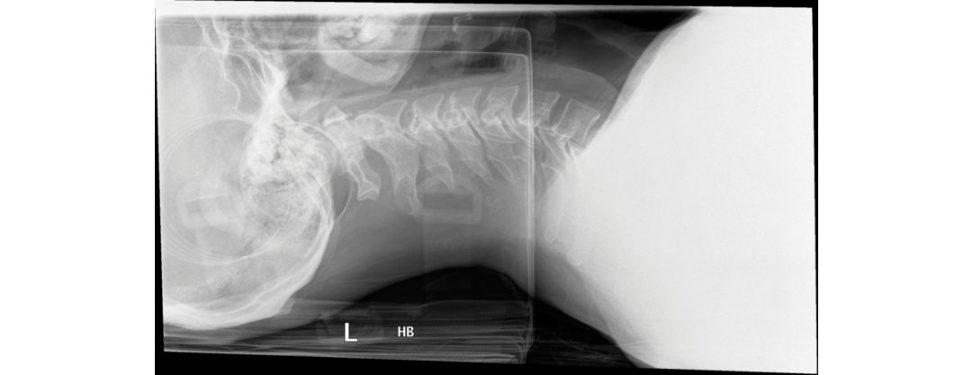
A radiograph of a normal cervical spine is shown (Figure 19.6a).
Apa tien t presents with an 8-week history of severe and worsening pain radiating from his neck down his arm into his hand. He has pins and needles affecting his thumb and index finger. What nerveroot is probably affected?
C6.
What weakness might you expect to find?
Weakness in wrist extension.
OK. What muscles are weak?
ERCL and ERCB.
Where is the most reliable place to test for C6 sensory change?
I’m not sure, on the back of the hand? The back of the hand is not precise enough. The American Spinal Injury Association Guidelines and the ATLS guidelines are that the most reliable place is on the dorsal surface of the proximal phalanx of the thumb.
An MRI scan shows a cervical disc prolapse. What is the standard surgical procedure for treatment of intractable pain resulting from this condition?
Anterior discectomy and fusion.
What is the approach to the anterior cervical spine?
This is another approach that unless you are going to be a spinal surgeon you are unlikely to come across; however, it is another classic approach and you should at least know the intervals. Position: Beach chair with head inring. Sandbag between shoulder blades, turn head away from planned incision site, neck extended. Landmarks C2/3: mandible. C3: hyoid. C4/5: thyroid cartilage. C6: cricoid cartilage and carotid tubercule. Skin incision: Transverse incision at the level of pathology (see levels above) from posterior border of sternocleidomastoid (SCM) (spinal accessory nerve) to the midline. If more than three levels are approached, then use a longitudinal incision.
Internervous plane: There is no true internervous plane during the anterior approach to the cervical spine.
Superficial dissection: Incise fascia over platysma inline with the skin and split the fibres of the platysma (cranial nerve VII) longitudinally.
Identify the anterior border of SC Mand incise the fascia immediately anterior to it.
Retract the SCM laterally and the strap muscles (C1, C2, C3) medially.
The carotid sheath can now be identified.
Develop a plane between the medial side of the carotid sheath and the midline structures (thyroid, trachea and oesophagus) by cuting the pretracheal fascia on the medial side of the sheath.
Watch for the superior and inferior thyroid arteries, which run transversely and may limit dissection above C3/4.
Deep dissection Develop a plane behind the pretracheal fascia and behind the oesophagus. The prevertebral fascia and longus coli muscle should now beseen and after spliting them longitudinally the anterior longitudinal ligament and the cervical vertebra can be identified.
What structures are at risk during this approach?
The carotid sheath and its contents. Be careful with using self-retaining retractors in this area. The vertebral artery lies in the costotransverse foramen on the lateral portion of the transverse processors and should not be visible unless the plane of the operations trays wellaway from the midline. The recurrent laryngeal nerve (RLN) may be injured during the deeper dissection of the approach. The sympathetic chain may be damaged, causing Horner’s syndrome. It should be protected by making sure dissection on to the bone is subperiosteal from the midline. Poorly placed retractors may damage the trachea or oesophagus.
What is the result of damage to the recurrent laryngeal nerve?
If one side is damaged the patient develops a hoarse voice; if both sides are damaged the patient can be left aphonic and have breathing difficulty.
Left- or right-sided approach?
The course of the RLN is more variable on the right, but dissection is easier for a right- handed surgeon. Studies have suggested the risk to the RLN is similar on both sides so surgeons should go for the side that they find easiest to do.
Figure 19.6a Lateral radiograph of a normal cervical spine.
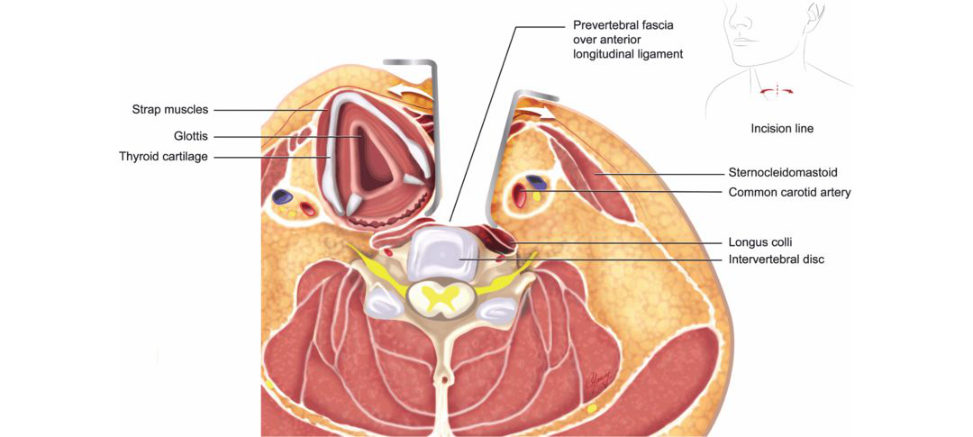
Figure 19.6b Anterior approach to the cervical spine. The sternocleidomastoid and carotid sheath are retracted laterally and the strap muscles, trachea and oesophagus medially. The longus coli and pretrachial fascia are exposed.
Structured oral examination question 7#
Shoulder fracture dislocation
How would you treat a shoulder fracture dislocation?
In an appropriately consented patient, I would prefer to reduce the fracture under anaesthesia with image-intensifier screening due to the risk of fracture propagation. I would explain to the patient that an open reduction may have to be considered if the closed reduction technique fails to reduce the shoulder. A candidate’s description of an y surgical approach should begin with a brief gambit on preparing the patient for surgery. It may seem a bit forced and contrived, but you just need to offer it up. If the examiners want to probe you further on this then that is their prerogative. In general, they want to get onto the main thrust of the question, which is the surgical approach.
What approach would you use for open reduction of shoulder?
A deltopectoral approach.
Describe the deltopectoral approach to the shoulder joint.
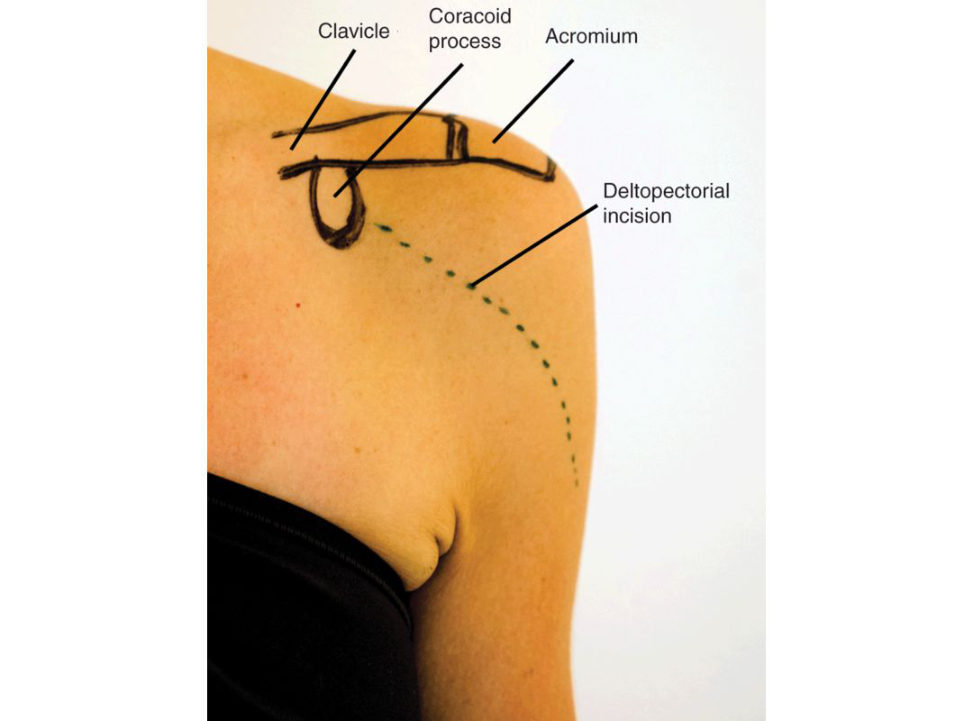
Position: I would position the patient in a beach chair with a sandbag between the spine and scapula. The patient is sat up at 45° with two pillows under the knees and the head supported in a headring reinforced with tape. I would make sure the anaesthetist is happy with the airway and neck position. Before scrubbing I would check the II visualizes the shoulder with ease. I would particularly want to avoid any obstructed views from the operating t able attachments and make sure swinging the II into position did not compromise or any interfere with the scrub set up or sterility. Again, this is how ‘YOU YOURSELF’ actually position and set up the patient in real life so as to perform the surgery. These liti lede tails are often forgoft en or not thought about, but are very important to the smooth flow of the operation. If the examiner is not wanting to probe you on this, they will quickly move you on. Landmarks The surgical landmarks (Figure 19.7a) are: Coracoid process. Deltopectoral groove (cephalic vein). Lateral border biceps brachii. Skin incision: I would make a skin incision in the line of the deltopectorial groove from just above the coracoid process along the deltopectorial groove to the deltoid insertion.
Internervous plane?
Between the axillary nerve (deltoid) and the medial/lateral pectoral nerves (pectoralis major).
Superficial dissection:
The interval is between the deltoid (axillary nerve) and the pectoralis major (medial and lateral pectoral nerves).
The cephalic vein lies in a layer of fat and is used to identify this interval. The vein can betaken either medially or laterally.
Make up your mind. Is it medial or lateral?
In most situations it is usually taken lateral as the tributaries come from the lateral side. In practice it is whatever ends up being easiest to do. This superficial dissection can bleed considerably, and I would make sure haemostasis is achieved before moving on to deep dissection.
Anything you can do to lessen bleeding in this area?
I have seen some surgeons infiltrate the area with local anaesthetic combined with adrenaline, but this is something I personally would prefer to avoid doing.
Why?
I prefer to know if a structure is bleeding, so I can secure haemostasis rather than risk it is bleeding postoperatively when the adrenaline wears off, causing a wound haematoma. Deep dissection: I would identify the shorthead of the biceps and coracobrachialis (both musculocutaneous nerve) and retract it medially and the deltoid laterally. The other option ist o perform a coracoid osteotomy.
How do you do a coracoid osteotomy?
Drill and tap before the osteotomy, if you are planning to fix it back with a screw. Avoid abduction of the arm, as this will bring the axillary sheath closer to the coracoid during the osteotomy. Stay lateral to the coracoid to avoid damage to the neurovascular structures on the medial aspect of the coracoid.
How many centimetres below the coracoid does the musculocutaneous nerve enter the coracobrachialis?
5–8 cm distal to the coracoid. Stay lateral to the muscle during deep dissection.
Damage to the musculocutaneous nerve causes paralysis of the elbow flexors.
Identify the subscapularis tendon and externally rotate the arm to put the subscapularis under tension. Aver tical capsulotomy is performed.
What are the structures at risk during the deltopectoral approach?
Musculocutaneous nerve. Axillary nerve – this is at risk during the release of the inferior part of the subscapularis; external rotation of the arm puts the subscapularis at stretch and takes the point of incision away from the axillary nerve. Cephalic vein. Anterior circumflex humeral artery.
Describe the quadrangular and triangular spaces in the shoulder.
Quadrangular space: Borders: Superior: teres minor. Inferior: teres major. Medial: longhead of triceps brachii. Lateral: humeral shaft. Contents: Axillary nerve and posterior circumflex humeral artery. Triangular space (this is the space between the two teres muscles. It has two sides, a base and an apex): Borders: Superior: lower border of teres minor. Inferior: teres major. Base (lateral boundary): longhead of triceps. Apex: meeting point of teres minor and major muscles. This can be pointed to on the lateral border of the scapula. Contents: Scapular circumflex artery and vein.
Triangular interval (this lies below the quadrangular space. It is formed due to the teres major muscle cuting across the longhead of triceps brachii to reach its insertion. It has two sides, a base and an apex):
Borders:
Superior (base): teres major.
Lateral boundary: humerus shaft or lateral head of the triceps.
Medial boundary: longhead of triceps.
Apex: meeting point of the medial and lateral boundaries.
Contents:
Profunda brachii artery.
Radial nerve.
Both structures pass through the lower triangular space to reach the spiral groove on the shaft of the humerus.
Figure 19.7a Surface landmarks: coracoid process and deltopectoral groove. Incision: straight incision from the tip of the coracoid process along the deltopectoral groove to the deltoid insertion.
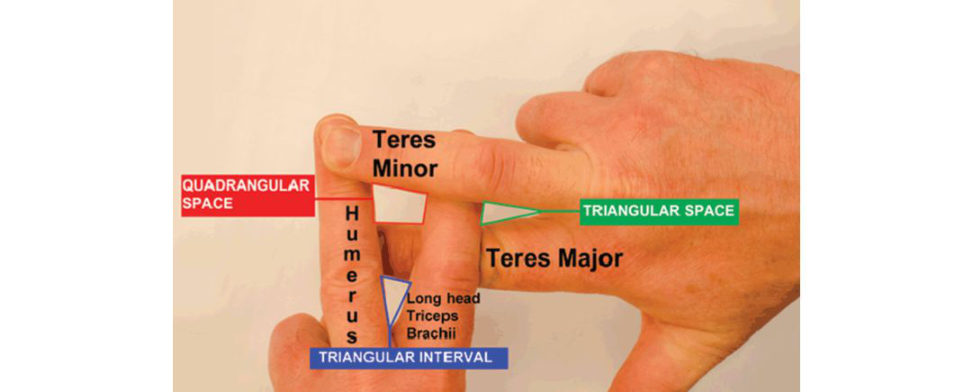
Figure 19.7b Spaces of the shoulder using finger arrangement.
Structured oral examination question 8#
Compartment syndrome of leg
A postoperative patient develops severe lower leg pain overnight following intramedullary nailing of the tibia. The pain hasnt improved much even after administering intravenous morphine.
What is the most likely diagnosis and how would you treat this patient?
Compartment syndrome of the lower leg. I would treat this with a two-incision technique for fasciotomy making sure that all four compartments of the lower leg are decompressed adequately.
What is compartment syndrome?
It is defined as ‘elevation of the in terstial pressure in a closed osseofascial compartment that results in a microvascular compromise’ (Mubarak and Hargens 1983). Compartment syndrome can occur at sites where muscle is surrounded by fascia. Common sites for compartment syndrome are the leg, forearm, hand, foot, thigh, buft ock and paraspinal muscles. The initial questions are usually forset ing the scene (definition , causes, pathophysiology, etc.). The questions are likely to lead to discussion onto the surgical anatomy of the lower leg compartments.
Describe the compartments of the lower leg. Draw a cross-section diagram of the middle third of the lower leg and describe the compartments.
Anterior compartment: tibialis anterior, extensor hallucis longus, extensor digitorum longus, peroneus tertius. Lateral compartment: peroneus longus, peroneus brevis. Deep posterior compartment: tibialis posterior, flexor digitorum longus, flexor hallucis longus. Superficial posterior compartment: gastrocnemius, soleus, plantaris. The description of compartments of lower leg by a cross-sectional diagram comes across as a much better answer compared to listing the names of muscles in each of the compartments. Practise an easy and quick way of drawing the lower leg compartments.
What is/are the incisions used for fasciotomy of the lower leg?
While there are several described techniques of lower leg fasciotomy, describing the two- incision technique is the non-controversial and safe answer in an exam. I would use a two-incision approach. The anterolateral incision is 2 cm lateral to the anterior border of the tibia midway between the tibia and the fibula. This decompresses the anterior and lateral compartments.
How long is the incision and what are your landmarks?
Around 15–20 cm. The proximal landmark is approximately 3 cm distal to the level of the tibial tuberosity. The fibula head is another useful landmark. The distal landmark is the lateral malleolus. These landmarks are often difficult to palpate if the leg is grossly swollen. The posteromedial incision is 1–2 cm posterior to the medial border of the tibia. This is a longitudinal incision the entire length of the gastrocnemius–soleus complex. It decompresses the superficial and deep posterior compartments.
How do you actually decompress the compartments?
For the anterolateral decompression I would perform a subcutaneous dissection to expose the fascia overlying the anterior and lateral compartments. I would identify the intermuscular septum between the anterior and lateral compartments. I would make a small transverse fascial incision at least 1 cm either side of the intermuscular septum at the midpoint of the incision. I would then longitudinally extend these incisions using scissors proximally aiming for the lateral border of the patella and distally the centre of the ankle joint. The sural nerve is at risk as it pieces the deep fascia (around 10–15 cm proximal to the lateral malleolus).
How do you actually know if you have decompressed the anterior compartment?
Identification of the deep peroneal nerve and/or the anterior tibial vessels would confirm this. With the posteromedial incision the superficial posterior compartment is dissected off the posteromedial border of the tibia. It is important to proximally release the soleus bridge from the back of the tibia to ensure adequate release of the deep posterior compartment. The fascia is incised along the whole length of the tibialis posterior and flexor digitorum muscle if needed. The posteromedial incision must be anterior to the posterior tibial artery in order to avoid injury to the perforating vessels that supply the skin used for local fasciocutaneous flaps. It is essential to preserve the perforators and avoid incisions crossing the line between them.
What do you mean by the soleus bridge?
The soleus muscle attaches to the medial edge of the tibia and dissecting these fibres (the ‘soleus bridge’) completely free from and exposing the underside of the tibia ensures entry into the deep posterior compartment.
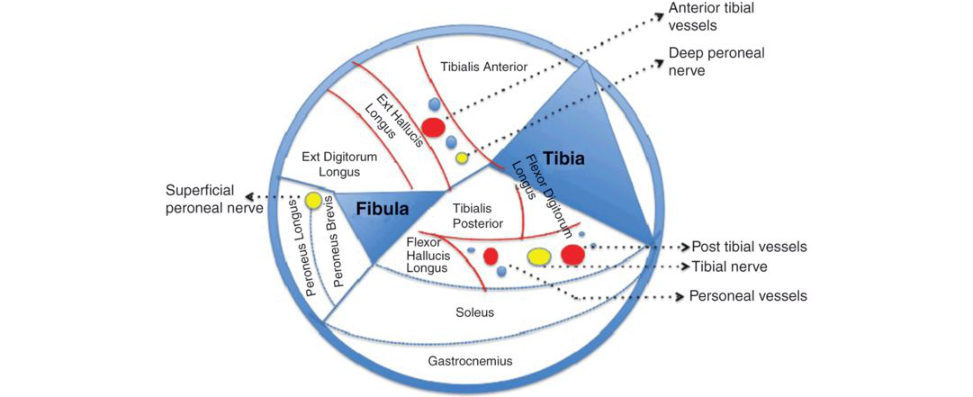
Figure 19.8a Muscle compartments of the lower leg.
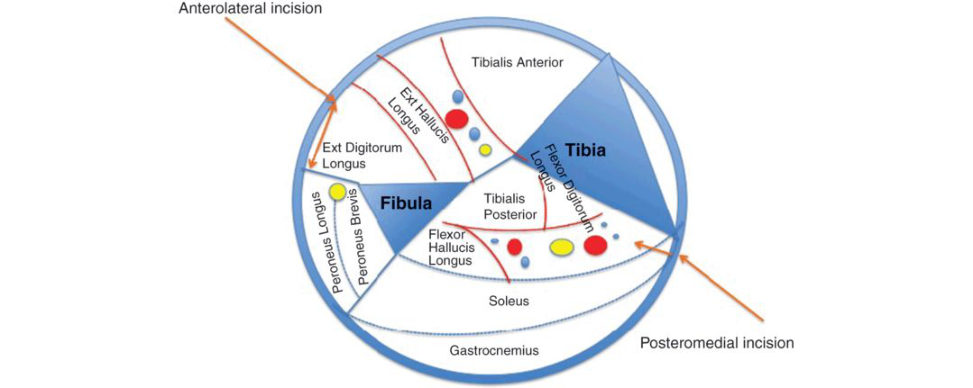
Figure 19.8b Fasciotomy incisions for compartment syndrome.
Further reading#
www.boa.ac.uk/wp-content/uploads/2015/01/BOAST-10.pdf www.bapras.org.uk/professionals/clinical-guidance/open-fractures-of-the-lower-limb#Full Guide
What are the structures at risk during fasciotomy?
The posteromedial incision should be placed anterior to the course of the posterior tibial artery to avoid damaging the perforators that supply the skin used for local fasciocutaneous flaps. Also, care should betaken to protect the saphenous nerve and vein. The anterolateral incision should be placed with caretaken to identify and protect the superficial peroneal nerve. Accurate skin incisions are important and need to be planned and marked out beforehand, especially if the leg is grossly swollen. A lateral incision inadvertently placed over the fibula will expose the periosteum and extending the incision too far distally may expose the peroneal tendons. Exposure of bone or tendons increases the risks of delayed healing, infection and, ultimately , amputation. As mentioned, the medial incision must be anterior to the posterior tibial artery, but placement too anteriorly leads to exposure of the tibia and an y underlying fracture.
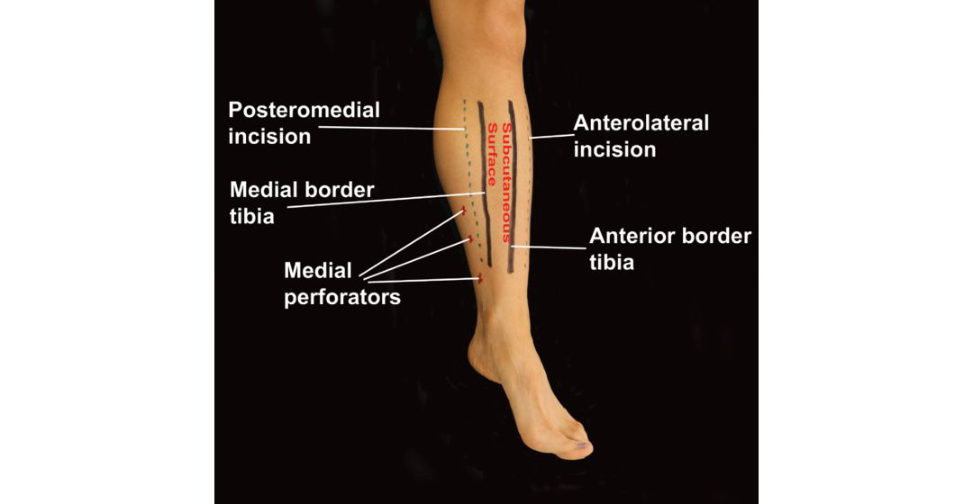
Figure 19.8c Recommended incisions for fasciotomies in the leg. The medial incision is used to decompress the superficial and deep posterior compartments and the lateral incision is used for decompression of the anterior and peroneal compartments. Margins of subcutaneous border of the tibia are marked in black, access incisions are marked in green and perforators arising from the medial side are marked as red crosses.
Structured oral examination question 9#
Anatomy of tarsal tunnel
What is medial tarsal tunnel syndrome?
The medial tarsal tunnel syndrome is a compression neuropathy of the tibial nerve or its terminal branches, the medial and lateral plantar nerve. Impingement occurs within the boundaries of the fibro-osseous tarsal tunnel or as it passes into the abductor hallucis muscle.
What is the tarsal tunnel?
It is an osseo-fascial tunnel on the posteromedial aspect of ankle with the following boundaries: Flexor retinaculum. Calcaneus (medial). Talus (medial). Abductor hallucis (inferior).
Where does the tarsal tunnel begin and end?
It begins a few centimetres proximal to the tip of the medial malleolus where the crural fascia starts to condense forming an unyielding ‘roof’, the flexor retinaculum (laciniate ligament). It ends where the medial and lateral plantar nerves enter or pass deep to the abductor hallucis. It is a descriptive space with ill-defined limits.
What are the contents of the tarsal tunnel (Figure 19.9)?
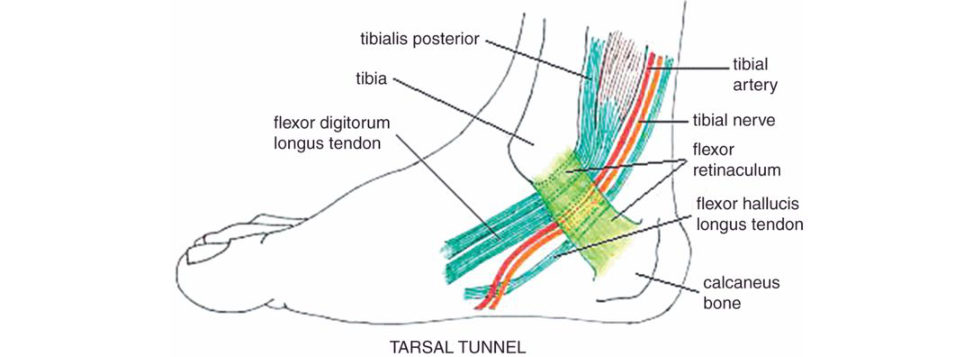
Tibial nerve, posterior tibial artery, FHL tendon, FDL tendon, tibialis posterior tendon.
What are the branches of the tibial nerve following its exit from the tarsal tunnel?
The tibial nerve has three distal branches: medial plantar, lateral plantar and medial calcaneal.
What is the Baxter nerve?
It is the first branch of the lateral plantar nerve. This nerve has been implicated as one of the causes of heel pain, which can be similar to plantar fasciitis. The Baxter nerve provides motor innervation for the abductor digift minimi.
Figure 19.9 Contents of tarsal tunnel.
Structured oral examination question 10#
Extensor compartments of wrist
A 62-year-old lady presents with not being able to extend the thumb after non-operativ e management of a distal radius fracture.
What is the likely diagnosis?
Rupture of the extensor pollicis longus (EPL) tendon.
Where is the EPL tendon at the dorsal aspect of the distal radius? Can you name the contents of the extensor compartments at the wrist?
1. Abductor pollicis longus (APL) and extensor pollicis brevis (EPB). 2. Extensor carpi radialis longus (ECRL) and extensor carpi radialis brevis (ECRB). 3. Extensor pollicis longus (EPL). 4. Extensor digitorum communis, extensor indicis proprius, posterior interosseous nerve. 5. Extensor digift minimi (EDM). 6. Extensor carpi ulnaris (EDU).
What is Vaughn-Jackson syndrome?
It is seen in rheumatoid hand/wrist conditions with rupture of the extensor tendon noted from the ulnar to the radial aspect. Atiritional rupture of the extensor tendons occurs due to DRUJ instability and carpal subluxation thereby resulting in dorsal ulnar head prominence. ED Mis typically the first extensor tendon ruptured in this condition.
Which compartment is involved inDe Quervain’s tenosynovitis?
First extensor compartment comprising of APL and EPB.
Structured oral examination question 11#
Anatomy of carpal tunnel
A 40-year-old lady with known hypothyroidism presents with intermift ent paraesthesias of thumb, index and middle fingers.
What could be the potential causes of this patient symptoms?
Carpal tunnel syndrome, cervical nerve impingement.
Describe the boundaries of the carpal tunnel.
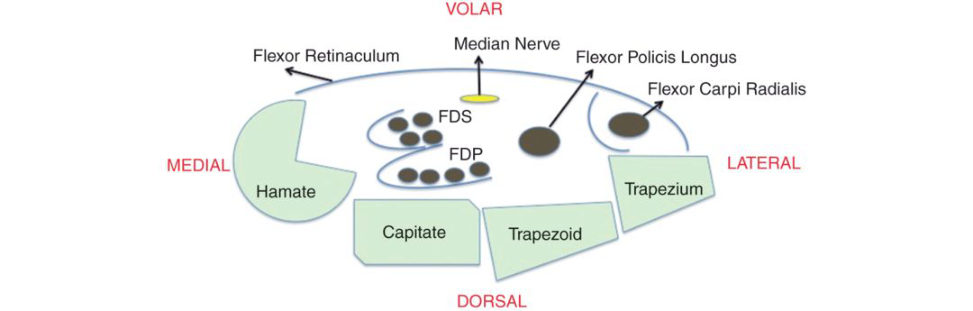
It is an osseo-fibrous canal situated in the volar aspect of the wrist. The boundaries are as follows: Ulnar: hook of hamate and pisiform. Radial: scaphoid tubercle and trapezium. Roof (palmar): transverse carpal ligament. Floor (dorsal): proximal carpal row.
Describe the contents of the carpal tunnel.
In addition to the medial nerve, the carpal tunnel contains nine tendons: the flexor pollicis longus, the four flexor digitorum superficialis and the four flexor digitorum profundus (Figure 19.10a).
What are the branches of median nerve around the carpal tunnel? What are the structures at risk during carpal tunnel release?
The palmar cutaneous branch of the median nerve lies between the palmaris longus and the flexor carpi radialis at the level of the wrist. It arises about 5 cm proximal to the wrist joint level and provides sensory innervation to the thenar skin. The recurrent motor branch of the median nerve has a variable course – 50% extraligamentous, 30% subligamentous and 20% transligamentous. The transligamentous course of recurrent motor branch can be at risk of unrecognized injury during carpal tunnel release. Hence, release on the ulnar aspect of the carpal tunnel reduces the hazard of this inadvertent injury.
What muscles does the median nerve innervate in the hand?
‘LOAF’ muscles in the thenar eminence including Lateral two lumbricals, Oppenens pollicis, Abductor pollicis and Flexor pollicis brevis.
Are you aware of any anastomotic anomaly that occurs between median and ulnar nerves?
Martin-Gruber anastomosis is a communication between the median and ulnar nerves in the forearm. Riche-Cannieu anastomosis is a communication between the median and ulnar nerves in the hand.
Describe how you would do a carpal tunnel release?
I am aware there are several techniques of carpal tunnel release including endoscopic, open and mini-open techniques. My preferred technique is an open carpal tunnel release under local anaesthesia. The incision is placed longitudinally from the distal wrist crease inline with the radial border of the ring finger. The distal extent of the incision is the Kaplan’s line, which is a transverse line from the distal border of the abducted thumb to the hook of the hamate (Figure 19.10b). The Kaplan’s line is an external reference for the deep palmar arch (Figure 19.10c). Following the skin incision, I would go through the fibres of the superficial palmar fascia to expose the transverse carpal ligament. Occasionally, palmaris brevis muscle fibres may need to be cleared to expose the transverse carpal ligament. The transverse carpal ligament is released on the ulnar side under direct vision, protecting the median nerve. I would ensure that releasing the transverse carpal ligament both proximally and distally adequately decompresses the median nerve.
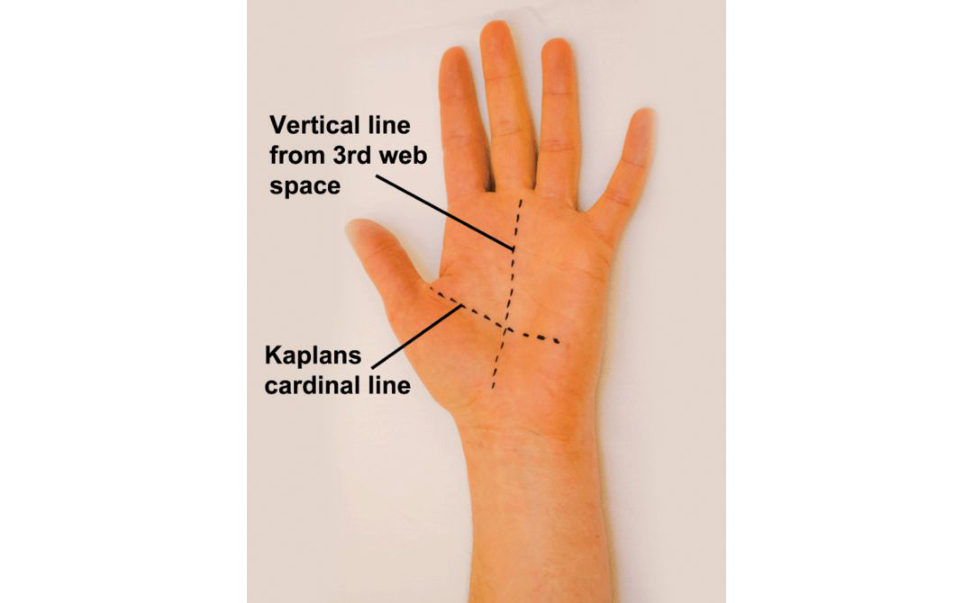
Figure 19.10a Anatomy, carpal tunnel.
Figure 19.10b Skin markings. Vertical line drawn from the third interdigital space to the wrist crease on the palm. Horizontal line drawn joining the radial aspect of the thumb to the styloid process (Kaplan’s cardinal line).
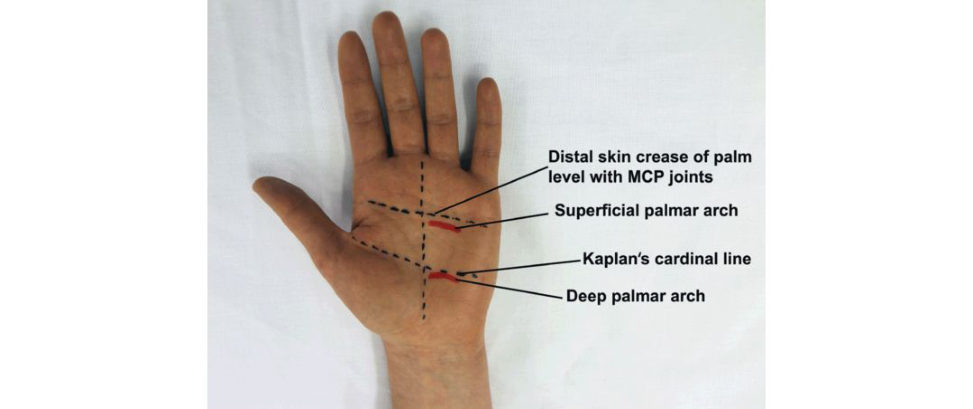
Figure 19.10c Vascular anatomy. The transverse palmar crease is the landmark for the superficial palmar arch. This is formed by the ulnar artery and the superficial palmar branch of the radial artery. Kaplan’s cardinal line is the landmark for the deep palmar arch. The deep palmar arch is formed mainly by the terminal part of the radial artery and the deep palmar branch of the ulnar artery.